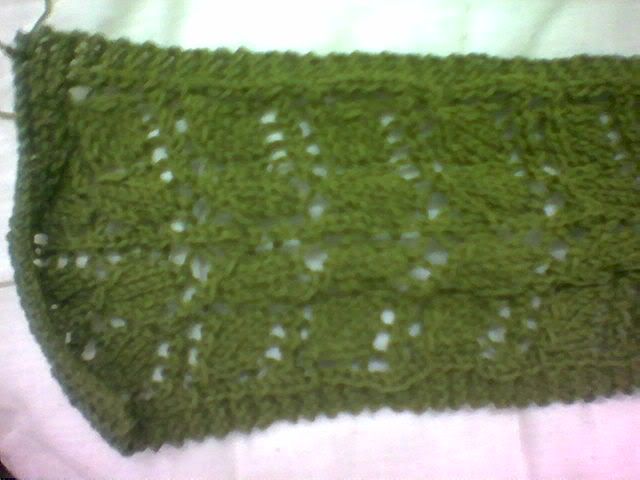
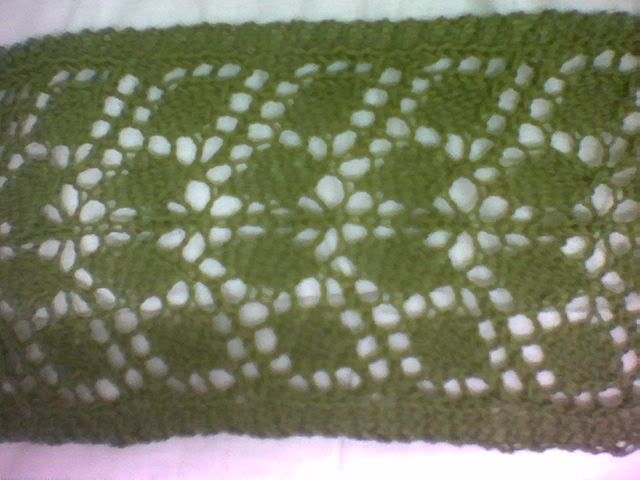
I've noticed that there're aren't many articles on blocking acrylic, especially in times of need. My interest in blocking acrylic is to get the final product flattened out so that the stitches can be seen nicely. Also acrylic is way softer when blocked. So here's my version of how to do it.
What you need:
1. A big clean towel
2. Tons of pins - pearlised rust-proof ones are my choice (OR) waste yarn - longer than your project length
3. Yarn needle
4. Steam iron
5. Patience
6. Wipers on your spectacles (if you wear them) because the steam will mist up your glasses and thats not fun when you don't know where you're going with your iron.
7. A bed to pin the needles to
How its done:
Okay first of all, you have to decide how you want to pin down your project. Pins or yarn? Personally I have used both and I can confidentally say that the waste yarn method gives a much more even edge, especially when blocking scarves. I'll explain both.
First you need to lay down your big clean towel on the bed so that you can pin your project onto the towel. I'm not sure why this is done but it's a practice I read about and prefer very much to follow.
I. Stretch me Baby, Yeah!
a. Pokey pokey time
Right, for the pinning method, stretch out your project and start pinning it from one end. Do not be afraid to stretch out the acrylic (but do NOT pull till it screams for mercy) so that the stitches are seen clearly and pin out all the edges. You can pin the middle as well, to even out your pattern.
You WILL need a lot of pins. Keep stretching and pinning till you reached the end of your towel. No space? No problem. You can pin the rest in the second round after the first bit has been blocked. Proceed to 'Steam me Baby, Yeah!'
b. A Stitch or two (X100)
This is the second method of stretching out your project. I read this in a blog once a long time back and I do not have a link, sorry. I do not have a picture to show you but I will try my best to make it sound coherent.
NOTE: This type of blocking is better to be done in one round, make sure you have enough space to stretch out your project to its full length to block it in one go.
Right, take your yarn needle and thread your waste yarn through. It's wiser to have this in a contrasting colour to your project. Do a very widely space running stitch all around the edge (you must know that this is best used for scarves and shawls etc. that require straight edges). Leave slack of about a foot and cut off. Do the same for all edges.
Now stretch out your edges. For example, for my scarf, I stretched out the waste yarn on the shorter edge and pinned it to the edge of my towel and stretch out the opposite end and did the same on the other side of the bed. Now that you have done that. You can take the waste yarn of the longer side and stretch it out making the scarf wider. Securely pin the ends of the yarn ( I usually tie it to my headboard and bottom edge of the bed).
This method ensures that your edges remain straight and that you will not end up with scalloped edges like the pinning method may induce. Use more pins to pin the project out if you are not satisfied.
II. Steam me Baby, Yeah!
Load your iron with max level water and set it to the highest setting. My iron has two steam settings which I set to the highest and a steam button that poouffffss out steam. Once the iron is heated. Go over your stretched fabric slowly. DO NOT touch the fabric, under NO circumstances. Acrylic melts on contact so don't even try unless its for kicks.
Keep a distance of about an inch or so and steam the whole thing. You can actually see the yarn stretch and ease out. It's pretty darn fascinating. Continue till you have steamed the whole length that you have stretched out. For those using the pinning method, you can steam the first part and then unpin and pin out the second part and steam as above.
Leave it to cool in the stretched state and steam again if required.
See, wasn't that easy as pie?
III. Wear me Baby, Yeah!
Now you can remove your waste yarn, snip it out and pull out in bits, or take out your pins. You will see that your project would probably remain in its stretched form. You may notice that your yarn is softer and well, more malleable. Enjoy!
Wrap it around your gorgeus self and POSE!
I was trying to load some pictures but Blogger was being really stubborn about it, so maybe later.
Oh wait, here are some links to the UNBLOCKED version and the BLOCKED version of my Branching Out scarf from Knitty.
Good luck blocking everyone!

16 comments:
Thanks for the great instructions. I have some baby sweaters that need blocking, and I worry about warping the garment.
=:8
Good luck blocking, but remember once acrylic is blocked, it remains the same forever! Some refer to it as killing acrylic, I on the other hand prefer "blocking", it's more gentler init?
This is exactly what I was looking for! Thanks!
I was am makind a sweater right now with some acrylic yarn and i'm a bit confused.
Would i need to block the garment everytime its washed? i heard acrylics keeps the shape after intitial blocking. Is this true?
Thank you
Hello~ You don't need to block the garment each time you wash it!
Once blocked, yes, it does remain like that for good so do take care in setting it in the exact way you want it.
Good luck!!
Thanks so much for your help! Now all those rolled scarves I've made can finally be fixed :D
Thanks for this. I wasn't sure if you even could block acrylic. Your blocked scarf looks heaps prettier!
Yes, it was fun. I blocked my little jumper, which is made of Zhivago, and you could see the little furry fibres fizzle (like they were melting like hair in a fire). When it cooled down, I took the pins out, and it lay flat! Ribbing! lol.
I'll stick up a picture today some time Ü
You're welcome :)
Can you use one of those steam cleaners (like the Shark) instead of a steam iron?
I probably think you could if it is hot enough. It's the heat that sort of helps the acrylic to stretch out permanently.
But to be on the safe side, try it out on a swatch perhaps?
Should I block first, then wash and dry, or wash and dry first? Will the dryer undo my blocking?
Do you block and then wash and dry, or vice versa? Will the dryer undo the blocking?
Since it's acrylic, if you wash and press it out and dry it, you might get a better idea of the shape you'll get after blocking.
Nope, the dryer can't reverse the blocking because the acrylic is sorta 'killed' when steamed :D
Hope that helps.
Have you tried blocking wires? They are a fantastic way to block. You end up with smooth, even edges with very little effort.
to SimplyForties : blocking wires???? Oh, plez....do tell....sounds intresting....
Post a Comment